谈一谈ThreadPoolExecutor
(原创)
花自飘零水自流。 -李清照 《一剪梅·红藕香残玉簟秋》
开发中,我们都有形或无形中用到线程池 (SpringBoot的@Async、Tomcat线程池 …..)。
线程池可以降低资源消耗(如果配置适当)。
线程池不用自己频繁创建、销毁线程。
能更好的管理线程,提高对线程的管理,并可查看执行任务数。
使用者设置参数,直接提交任务就行了
本文将涉及到的类会讲一讲,会有些长,请耐心看。
分析ThreadPoolExecutor之前我们先看看它的父接口和父类:
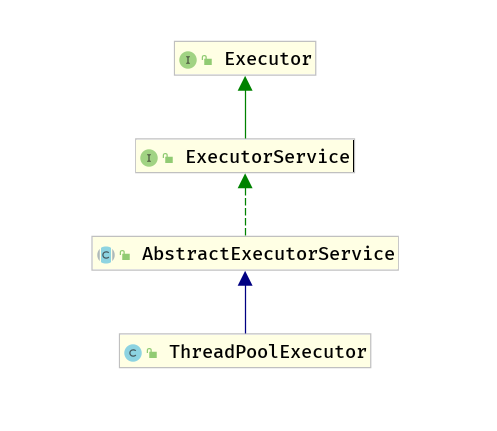
前奏
Executor
这个接口只有一个方法, 提交一个任务,没有返回任务的结果值。
1
void execute(Runnable command);
1
2
3
Executor executor = anExecutor;
executor.execute(new RunnableTask1());
executor.execute(new RunnableTask2());ExecutorService
这个继承了Executor,有更多契约。
1
2
3
4
5
6
7
8
9
10
11
12
13
14
15
16
17
18
19
20
21
22
23
24
25
26
27
28
29
30
31
32
33
34
35
36
37
38
39
40
41
42
43
44
45
// 任务继续执行并执行队列剩余的任务。不接受新任务。
void shutdown();
// 一旦调用,停止工作线程的任务(工作线程需响应中断,否则无法停止),不执行队列剩余任务,返回队列的任务。
List<Runnable> shutdownNow();
// 返回线程池是否Shutdown状态
boolean isShutdown();
// 返回线程池是否完全关闭状态
boolean isTerminated();
// 一直阻塞,直到线程池状态Terminated后回调。
// true 线程池成功关闭后返回,false 超时
boolean awaitTermination(long timeout, TimeUnit unit)
throws InterruptedException; //响应中断
// 有返回值的任务提交。 函数式接口Callable<V>接口方法: V call() throws Exception;
// 如果想要阻塞等待任务返回结果:exec.submit(aCallable).get();
<T> Future<T> submit(Callable<T> task);
// T result 自定义返回结果的类型
<T> Future<T> submit(Runnable task, T result);
Future<?> submit(Runnable task);
// 执行给定任务,当他们全部执行完成,返回结果和状态。 Future#isDone 任务可能正常完成终止或通过抛出异常终止
<T> List<Future<T>> invokeAll(Collection<? extends Callable<T>> tasks)
throws InterruptedException;
// timeout 等待的最长时间, unit 超时参数的时间单位,
//如果任务执行超时,这任务的状态将不是完成。
<T> List<Future<T>> invokeAll(Collection<? extends Callable<T>> tasks,
long timeout, TimeUnit unit)
throws InterruptedException;
// 任务集合,只要有一个完成即可。未完成的任务将被取消 ExecutionException这个异常是没有任务成功完成
<T> T invokeAny(Collection<? extends Callable<T>> tasks)
throws InterruptedException, ExecutionException;
// 同样的,只是设置了超时。TimeoutException这个异常是: 指定时间过去了,但是没有一个任务完成
<T> T invokeAny(Collection<? extends Callable<T>> tasks,
long timeout, TimeUnit unit)
throws InterruptedException, ExecutionException, TimeoutException;AbstractExecutorService
抽象类,实现ExecutorService接口。提供ExecutorService的默认实现。
1
2
3
4
5
6
7
8
9
10
11
12
13
14
15
16
17
18
19
20
21
22
23
24
25
26
27
28
29
30
31
32
33
34
35
36
37
38
39
40
41
42
43
44
45
46
47
48
49
50
51
52
53
54
55
56
57
58
59
60
61
62
63
64
65
66
67
68
69
70
71
72
73
74
75
76
77
78
79
80
81
82
83
84
85
86
87
88
89
90
91
92
93
94
95
96
97
98
99
100
101
102
103
104
105
106
107
108
109
110
111
112
113
114
115
// value 返回的默认值
  protected <T> RunnableFuture<T> newTaskFor(Runnable runnable, T value) {
        return new FutureTask<T>(runnable, value);
    }


  public Future<?> submit(Runnable task) {
        if (task == null) throw new NullPointerException();
        RunnableFuture<Void> ftask = newTaskFor(task, null);
        execute(ftask);
        return ftask;
    }
// 下面的submit都差不多,只是任务类型不同。
...


// 注意这个方法,invokeAny都会用到
    private <T> T doInvokeAny(Collection<? extends Callable<T>> tasks,
                              boolean timed, long nanos)
        throws InterruptedException, ExecutionException, TimeoutException {
    // 校验
        if (tasks == null)
            throw new NullPointerException();
        int ntasks = tasks.size();
        if (ntasks == 0)
            throw new IllegalArgumentException();

    	// 存储任务返回值列表
        ArrayList<Future<T>> futures = new ArrayList<Future<T>>(ntasks);
    // 这个是安排提交的任务。
    // 这个类实现CompletionService接口。内部其实还是用的是AbstractExecutorService,可扩展。
    // 里面有存储完成任务的队列(completionQueue),对于任务的获取(take、poll、poll(timeout, unit))
        ExecutorCompletionService<T> ecs =
            new ExecutorCompletionService<T>(this);


        try {
           // 记录异常
            ExecutionException ee = null;
            // 是否设置了超时
            final long deadline = timed ? System.nanoTime() + nanos : 0L;

            // 任务迭代器
            Iterator<? extends Callable<T>> it = tasks.iterator();

            // 开始一个任务,并且存储返回值。
            futures.add(ecs.submit(it.next()));
            // 待执行任务数-1
            --ntasks;
            // 已添加任务数+1
            int active = 1;

            for (;;) {
                // 注意这里返回的是FutureTask<T>(callable);
                Future<T> f = ecs.poll();
                // 代表没有已完成的任务。
                if (f == null) {
                    if (ntasks > 0) {
                        // 待执行任务数-1
                        --ntasks;
                        // 重新加一个任务
                        futures.add(ecs.submit(it.next()));
                        // 已添加任务数+1
                        ++active;
                    }
                    // 注意这里,一开始有人任务提交都是+1,那么什么时候为0呢?
                    // 玄机就是在下面f!=null的时候,如果下面任务正常完成了那么肯定会return,除非异常,
                    // 注意:下面 if (f != null)并没有 throw e,抛异常操作是在自旋之外。
                    // 也就是说,这里的active==0,是所有任务都失败了。必须出去。
                    else if (active == 0)
                        break;
                    // 检验是否超时
                    else if (timed) {
                        // 获取任务执行结果
                        f = ecs.poll(nanos, TimeUnit.NANOSECONDS);
                        if (f == null)
                            throw new TimeoutException();
                        nanos = deadline - System.nanoTime();
                    }
                    else
                        //阻塞获取已完成的任务
                        f = ecs.take();
                }
                // 说明已经有完成的任务了,
                if (f != null) {
                    // 减提交的任务数。
                    --active;
                    try {
                        // 阻塞获取,除非有异常
                        return f.get();
                    } catch (ExecutionException eex) {
                        ee = eex;
                    } catch (RuntimeException rex) {
                        ee = new ExecutionException(rex);
                    }
                }
            }
			// 这里就是接自旋的异常。
            if (ee == null)
                ee = new ExecutionException();
            throw ee;
		// 无论是否正常完成,都取消其他任务。
        } finally {
            // 取消其他任务
            for (int i = 0, size = futures.size(); i < size; i++)
                futures.get(i).cancel(true);
        }
    }
FutureTask
- 一个可以取消的异步计算,get()将阻塞如果没完成任务
- 可用于包装Callable或Runnable 对象
- FutureTask可以提交给Executor用于执行
- 状态转换:
- NEW -> COMPLETING -> NORMAL
- NEW -> COMPLETING -> EXCEPTIONAL
- NEW -> CANCELLED
- NEW -> INTERRUPTING -> INTERRUPTED
下面我们看一看FutureTask
1
2
3
4
5
6
7
8
9
10
11
12
13
14
15
16
17
18
19
20
21
22
23
24
25
26
27
28
29
30
31
32
33
34
35
36
37
38
39
40
41
42
43
44
45
46
47
48
49
50
51
52
53
54
55
56
57
58
59
60
61
62
63
64
65
66
67
68
69
70
71
72
73
74
75
76
77
78
79
80
81
82
83
84
85
86
87
88
89
90
91
92
93
94
95
96
97
98
99
100
101
102
103
104
105
106
107
108
109
110
111
112
113
114
115
116
117
118
119
120
121
122
123
124
125
126
127
128
129
130
131
132
133
134
135
136
137
138
139
140
141
142
143
144
145
146
147
148
149
150
151
152
153
154
155
156
157
158
159
160
161
162
163
164
165
166
167
168
169
170
171
172
173
174
175
176
177
178
179
180
181
182
183
184
185
186
187
188
189
190
191
192
193
194
195
196
197
198
199
200
201
202
203
204
205
206
207
208
209
210
211
212
213
214
215
216
217
218
219
220
221
222
223
224
225
226
227
228
229
230
231
232
233
234
235
236
237
238
239
240
241
242
243
244
245
246
247
248
249
250
251
252
253
254
255
256
257
258
259
260
261
262
263
264
265
266
267
268
269
270
271
272
273
274
275
276
277
278
279
280
281
282
283
284
285
286
287
288
289
290
291
292
293
294
295
296
297
298
299
300
301
302
303
304
private volatile int state;
// 任务状态(state)。
    private static final int NEW          = 0;
    private static final int COMPLETING   = 1;
    private static final int NORMAL       = 2;
    private static final int EXCEPTIONAL  = 3;
    private static final int CANCELLED    = 4;
    private static final int INTERRUPTING = 5;
    private static final int INTERRUPTED  = 6;


// 任务返回值 或者 异常
// 注意没有volatile ,受读写保护
//只有cas成功的线程才能赋值。
private Object outcome;

//执行callable的线程
private volatile Thread runner;

// 等待的线程节点
private volatile WaitNode waiters;


public FutureTask(Callable<V> callable) {
        if (callable == null)
            throw new NullPointerException();
        this.callable = callable;
        this.state = NEW;
    }
// 注意这个 result 是给定的返回值
public FutureTask(Runnable runnable, V result) {
       // 任务适配器  返回RunnableAdapter类型。如果调用callable.call(),任务将会执行,完成后返回result
        this.callable = Executors.callable(runnable, result);
        this.state = NEW;
}

// 这个只要是CANCELLED、INTERRUPTING、INTERRUPTED状态,就是认为任务取消了
public boolean isCancelled() {
     return state >= CANCELLED;
}

// 只要不是新建状态的任务都是Done状态,包括阻塞、异常、正常状态
public boolean isDone() {
     return state != NEW;
}


public V get() throws InterruptedException, ExecutionException {
        int s = state;
    //只要是NEW、COMPLETING状态,就阻塞获取。
        if (s <= COMPLETING)
            //当多个线程进入时,等待任务完成。
            s = awaitDone(false, 0L);
    // 这里只是任务状态是NORMAL才成功返回,否则抛异常外面接。
        return report(s);
}

// 此方法响应中断。
private int awaitDone(boolean timed, long nanos)
        throws InterruptedException {
    //是否设置了超时。
        final long deadline = timed ? System.nanoTime() + nanos : 0L;
        WaitNode q = null;
        boolean queued = false;
    // 自旋。
        for (;;) {
            // 如果该线程被中断了,那么移除等待节点,
            if (Thread.interrupted()) {
                //移除当前节点,第一次进来,q是为空的,也就是什么也不做。
                removeWaiter(q);
                throw new InterruptedException();
            }

            int s = state;
            // 不是新建状态,也不是执行任务的状态,返回state。
            if (s > COMPLETING) {
                if (q != null)
                    q.thread = null;
                return s;
            }
            // 这个任务是在执行中,让出CPU调度
            else if (s == COMPLETING) // cannot time out yet
                Thread.yield();
            else if (q == null)
                //任务是新建状态,包装当前线程。
                q = new WaitNode();
            else if (!queued)
                //来到这里,就是线程包装WaitNode好了,进入链表等待。这个是cas入队新创建的当前线程。头插法。等待
                queued = UNSAFE.compareAndSwapObject(this, waitersOffset,
                                                     q.next = waiters, q);

            // 检验是否超时等待
            else if (timed) {
                nanos = deadline - System.nanoTime();
                if (nanos <= 0L) {
                    removeWaiter(q);
                    return state;
                }
                LockSupport.parkNanos(this, nanos);
            }
            else
                //线程入队了,可以阻塞了。一旦任务执行完成,也就是status>COMPLETING,
                //finishCompletion();后会LockSupport.unpark(t);
                //线程又会从这里醒来,再继续自旋,满足条件后return state
                LockSupport.park(this);
        }
    }

// s等于status
    private V report(int s) throws ExecutionException {
        Object x = outcome;
        //NORMAL完成了任务,就返回
        if (s == NORMAL)
            // 返回outcome
            return (V)x;
        // 任务状态是CANCELLED、INTERRUPTING、INTERRUPTED,抛出取消异常。
        if (s >= CANCELLED)
            throw new CancellationException();
        //如果都不是,就是执行异常。
        throw new ExecutionException((Throwable)x);
    }


// 移除中断、超时的节点,
    private void removeWaiter(WaitNode node) {
        // 注意这个细节,设置了thread为空,下面自旋有用。
        if (node != null) {
            node.thread = null;
            //标识外层循环
            retry:
            for (;;) {
                //不为空就遍历单向链表
                for (WaitNode pred = null, q = waiters, s; q != null; q = s) {
                    //下一个节点。
                    s = q.next;
                    //只要是不为空的thread,就不是刚开始设置的node。
                    //那么就一直找
                    if (q.thread != null)
                        //记录前面的节点
                        pred = q;
                    //如果找到了当前thread为空。
                    else if (pred != null) {
                        //那么上一个节点,连接下一个节点。
                        pred.next = s;
                        //检验是否被其他线程改。这部分没搞懂。
                        if (pred.thread == null) // check for race
                            continue retry;
                    }
                    //如果pred为空,当前节点,q.thread为空
                    //交换当前节点为下一个节点。
                    else if (!UNSAFE.compareAndSwapObject(this, waitersOffset,
                                                          q, s))
                        continue retry;
                }
                // 这里就是q=null,跳出自旋。
                break;
            }
        }
    }

// 设置返回值
    protected void set(V v) {
        //前提是任务为新建状态。
        if (UNSAFE.compareAndSwapInt(this, stateOffset, NEW, COMPLETING)) {
            outcome = v;
            UNSAFE.putOrderedInt(this, stateOffset, NORMAL); // final state
            finishCompletion();
        }
    }

// 设置返回异常结果
 protected void setException(Throwable t) {
        if (UNSAFE.compareAndSwapInt(this, stateOffset, NEW, COMPLETING)) {
            outcome = t;
            UNSAFE.putOrderedInt(this, stateOffset, EXCEPTIONAL); // final state
            finishCompletion();
        }
    }


   public void run() {
       // 保证任务是新建状态。如果是新建状态,设置执行任务的线程
        if (state != NEW ||
            !UNSAFE.compareAndSwapObject(this, runnerOffset,
                                         null, Thread.currentThread()))
            return;
        try {
            Callable<V> c = callable;
            if (c != null && state == NEW) {
                V result;
                boolean ran;
                try {
                    //执行任务,并拿到返回值。
                    result = c.call();
                    ran = true;
                } catch (Throwable ex) {
                    result = null;
                    ran = false;
                    // 设置异常原因
                    setException(ex);
                }
                //任务执行完成
                if (ran)
                    //设置任务执行状态,NEW->COMPLETING,设置任务的执行结果:outcome=result。
                    //成功后在设置任务状态(UNSAFE.putOrderedInt):COMPLETING->NORMAL
                    set(result);
            }
        } finally {
            // 无论是否正常完成,清除当前任务的线程。防止并发调用run
            runner = null;
            int s = state;
            //响应中断。
            if (s >= INTERRUPTING)
                handlePossibleCancellationInterrupt(s);
        }
    }


// 此方法没设置result.
    protected boolean runAndReset() {
        if (state != NEW ||
            !UNSAFE.compareAndSwapObject(this, runnerOffset,
                                         null, Thread.currentThread()))
            return false;
        boolean ran = false;
        int s = state;
        try {
            Callable<V> c = callable;
            if (c != null && s == NEW) {
                try {
                    c.call();
                    ran = true;
                } catch (Throwable ex) {
                    setException(ex);
                }
            }
        } finally {

            runner = null;
			// 再获取一下状态,响应中断
            s = state;
            if (s >= INTERRUPTING)
                handlePossibleCancellationInterrupt(s);
        }
        // 执行完成了并且还是任务还是新建状态
        return ran && s == NEW;
    }

// 取消任务方法。
// mayInterruptIfRunning状态标识:true :INTERRUPTING  false :CANCELLED
    public boolean cancel(boolean mayInterruptIfRunning) {
        if (!(state == NEW &&
              UNSAFE.compareAndSwapInt(this, stateOffset, NEW,
                  mayInterruptIfRunning ? INTERRUPTING : CANCELLED)))
            // 任务状态不是新建的,或者cas失败
            return false;
        try {
            if (mayInterruptIfRunning) {
                try {
                    Thread t = runner;
                    if (t != null)
                        // 中断
                        t.interrupt();
                } finally { // final state
                    // 设置INTERRUPTED状态。
                    UNSAFE.putOrderedInt(this, stateOffset, INTERRUPTED);
                }
            }
        } finally {
            finishCompletion();
        }
        return true;
    }


	// run方法的finally都用这个,用于唤醒线程并且把等待节点清空。
   private void finishCompletion() {

        for (WaitNode q; (q = waiters) != null;) {
            // cas设置 WaitNode为空
            if (UNSAFE.compareAndSwapObject(this, waitersOffset, q, null)) {
                for (;;) {
                    Thread t = q.thread;
                    // 只要还有thread,就一直唤醒。并且清空WaitNode节点。
                    if (t != null) {
                        q.thread = null;
                        LockSupport.unpark(t);
                    }
                    WaitNode next = q.next;
                    if (next == null)
                        break;
                    q.next = null; // unlink to help gc
                    q = next;
                }
                break;
            }
        }
       // 子类实现
        done();
       // 已经执行完成了,无任务了。
        callable = null;
    }
中篇
ThreadPoolExecutor
说了这么多,前面是铺垫,现在讲线程池了(全是重点),仔细读一读,不禁感叹,doug lea大师就是大师,既能把所有情况都考虑到,又能把代码写的如此简洁。让我们体会一下细节的力量,细节是洪水猛兽。
把线程池化是提高资源的利用率,是统一管理资源,监控已有资源状态。
这里记录下个人对源码结合注释的解读。
线程池的生命周期状态:
- RUNNING
- SHUTDOWN
- STOP
- TIDYING
- TERMINATED
1 | // workerCount : 有效的线程数量,存活线程。 |
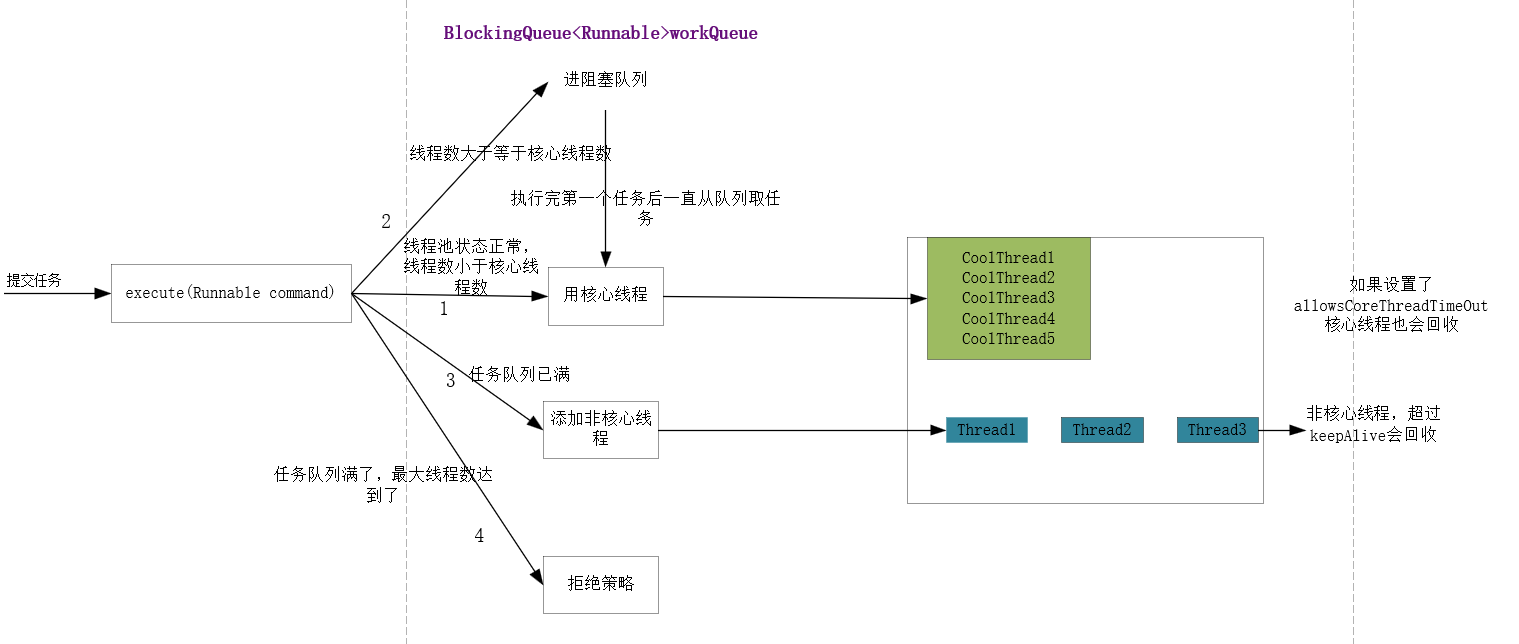
图1 提交任务的判断
经上图的提交任务的策略顺序来看,阻塞队列更像一个起到缓冲作用的用法,当核心线程都在跑任务,还要提交任务,就进缓冲。注意这个缓冲,如果把设置的Integer最大,如果场景的任务非常多。是很容易OOM的。因为非核心线程没用上,更不用说拒绝策略了。
线程池的七大参数,根据场景设置,事实是这个并不好设置,需要经验。
构造方法:
1 |
|
提交任务的入口:
1 |
|
我们可以看到,提交任务跟addWorker关系密切,线程池的状态尤为重要。
好了,这儿我们先看看Worker
1 |
|
线程从阻塞队列获取任务:
1 | // 从阻塞队列获取任务。 |
在getTask中,会检查线程池状态,并且符合条件杀掉多余的线程。
下面我们看看添加工作线程的方法。太妙了。
1 |
|
1 |
|
马上关闭:
1 | public List<Runnable> shutdownNow() { |
尾声
好了,到了这就是接近尾声了,我们看看一些辅助方法:
1 | // 这个方法是等待指定时间,看能不能等到线程池关闭后,用户做一些生命周期的操作 |
还可以设置核心线程数,最大线程数,keepAliveTime,拒绝策略,线程工厂。
1 |
|
拒绝策略(当然可以自己实现RejectedExecutionHandler自定义自己的拒绝策略),我们看看线程池默认提供的拒绝策略:
CallerRunsPolicy : 拿去任务的线程自己执行(前提是线程池状态正常run)
AbortPolicy: 默认抛RejectedExecutionHandler异常
DiscardPolicy:忽略此任务
DiscardOldestPolicy:把任务队列的最老的任务弹出,新增现在提交的任务
结束。